Following my article Getting started with Global Secure Access – Private Access, I want to share how to deploy the Global Secure Access (GSA) client and elaborate on the various registry modifications currently available for the client.
In this article I’ll use the Powershell AppDeploy Toolkit as a framework for the GSA client setup and configuration process. If you are not familiar with Powershell AppDeploy Toolkit (PSADT), I have a few articles on how to get started with streamlining application management with PSADT and Intune these articles serve as a foundation for understanding how PSADT works.
If you want to know more about what Global Secure Access is, I recommend that you read my article on the subject, it should get you started with GSA and provide you with some basic knowledge about how to configured and setup GSA.
Global Secure Access client deployment
Installing the GSA client manually is very easy, as there are no options/choices to consider during the setup process. However, as with any other manually installed application a manual process is also involved making post-install customizations if needed. In a scenario where Global Secure Access is being tested it’s probably not an issue to do a manual deployment of the GSA client on a couple of Windows devices. However, if you are going to deploy the GSA client in a larger scale and maybe even include 1 or more customizations, you can use Microsoft Intune to deploy the GSA client including customizations.
Prerequisites
- Windows 10 and Windows 11 64-bit versions
- Azure Virtual Desktop single-session (Multi-session is not supported)
- Windows 365
- Local administrator credentials are required to install or upgrade the GSA client
- A Global Secure Access license and Entra ID P1 or P2 license assigned to the user
Download the client setup file
The GSA client setup file can be obtained via the Microsoft Entra admin center:

At the time of writing, this will provide you with the v2.8.45.0 og the GSA client setup file:

The release notes for this version are found here:
Global Secure Access Client for Windows Release Notes – Global Secure Access | Microsoft Learn
I recommend to stay up to date with any changes or additions to the GSA client.
Configuring the PSADT deployment script
Microsoft has a great article on how to install the Global Secure Access client. The article mentions, among other things, 6 client registry keys/values which can be used to restrict access to certain parts of the Global Secure Access client.
In addition to the above, the deployment script will also address the so called “Kerberos Negative Caching” issue.
Until I started working with Global Secure Access I had never heard of kerberos negative caching. In short, kerberos nagative caching occurs when the closest domain controller is not available for the kerberos ticket, the request fails and the domain controller is not contacted again for the next 10 minutes. After 10 minutes the GSA client queries the domain controller this time it will succeed in getting the kerberos ticket. This means that for up to 10 minuttes a kerberos ticket is unavailable which will break kerberos SSO to i.e. an on-prem file server.
Let’s have a closer look at how to use PSADT to deploy the GSA client in Windows, including a couple of registry tweaks mentioned above.
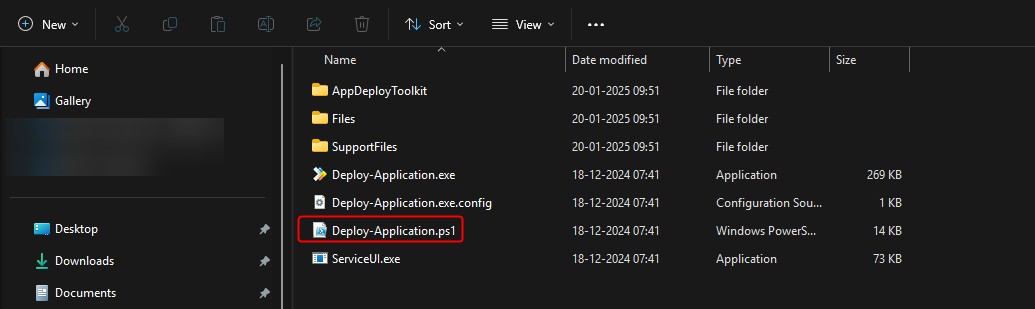
Copy the GlobalSecureAccessClient.exe to the Files folder
Open/edit the Deploy-Application.ps1 in your favorite Powershell editor, in this case I am using Visual Studio Code:
Configure the variables

Scroll down to the Install and Post-Install sections of the script.
Install
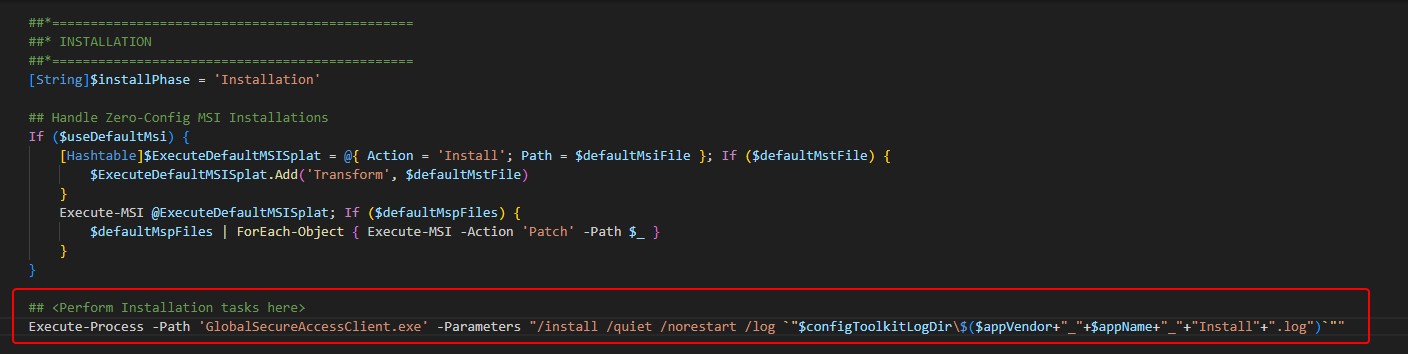
This will do a quiet install and suppress any reboots. Additionally a setup install log file is created in the C:\ProgramData\Microsoft\IntuneManagementExtension\Logs folder
Post-Install
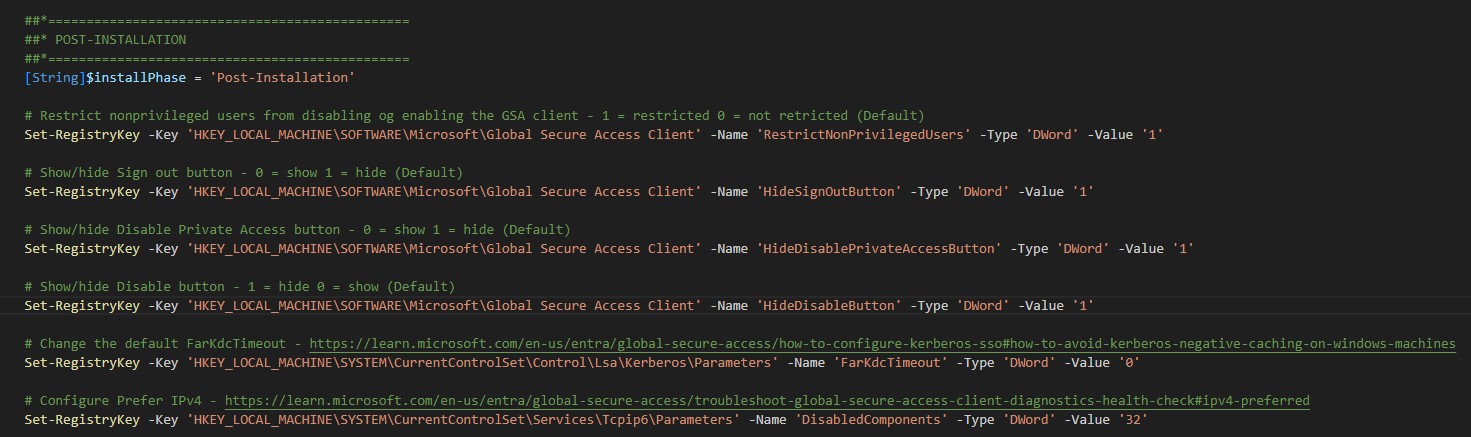
These are the current device specific registry values which should be considered when configuring the GSA client.
Scroll down to the Uninstall section of the script
Uninstall
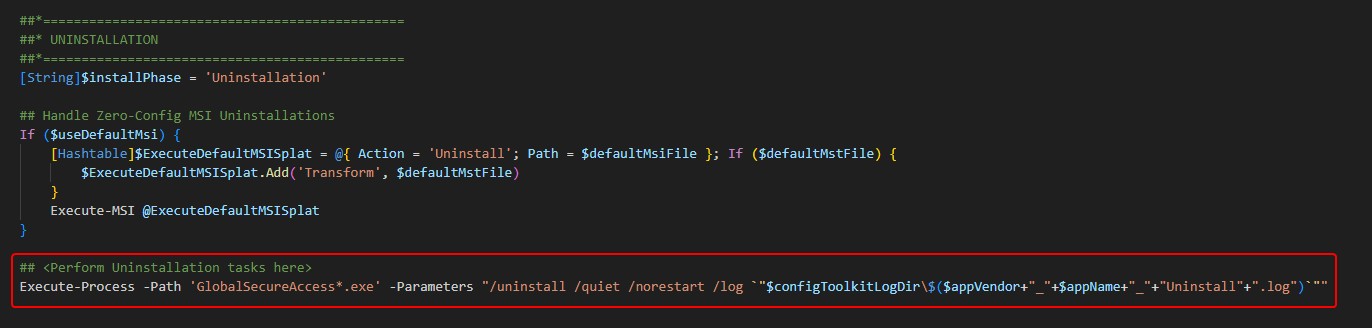
This will do a quiet uninstall and supress any reboots. Additionally, a setup uninstall log file is created in the C:\ProgramData\Microsoft\IntuneManagementExtension\Logs folder
GSA Client Registry tweaks
As mentioned, there are a few registry tweaks which should be considered before deploying the GSA client. Let’s have a look at the 6 device specific registry values in the deplyoment script. All regsistry values below are configured in the HKEY_LOCAL_MACHINE\Software\Microsoft\Global Secure Access Client registry key.
RestrictNonPrivilegedUsers
Value of 1 – Prevent users that are not local admins, from disabling or enabling the GSA client. If a non-admin clicks the disable/enable button, a UAC prompt will appear
Value of 0 – Allow users that are not local admins to disable/enable the GSA client. This is the default value.
New-ItemProperty -Path 'HKLM:Software\Microsoft\Global Secure Access Client' -Name RestrictNonPrivilegedUsers -Value 0 -PropertyType Dword
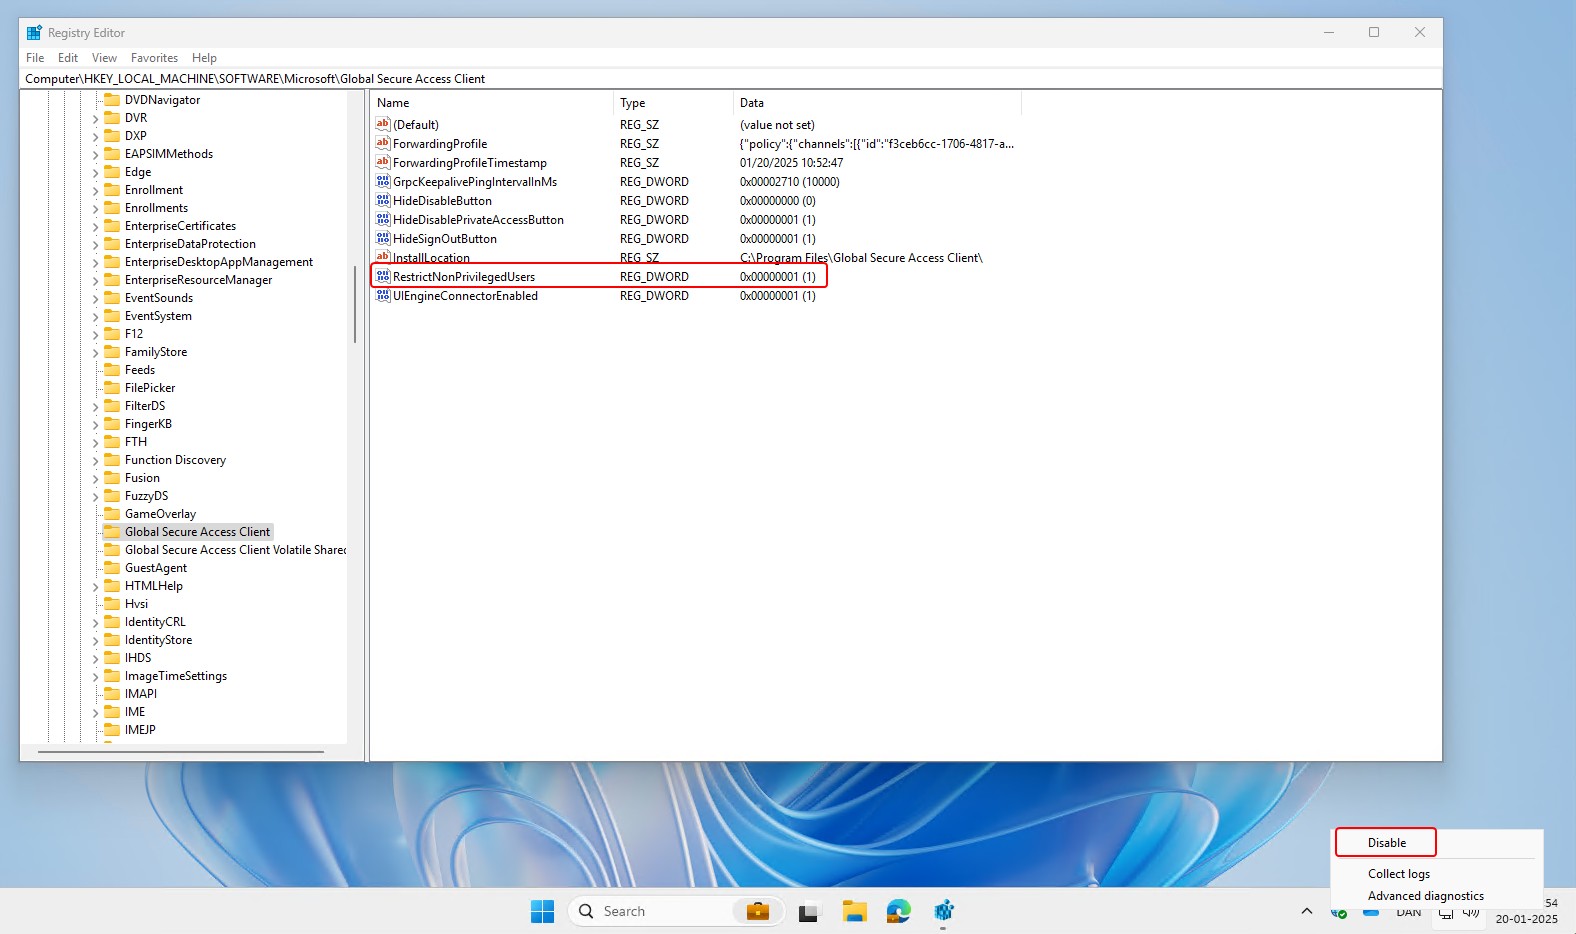
I recommend that you restrict access for non-admin users to disable the GSA client to prevent users from accidentally disabling the GSA client and to make sure that users can access resources published in Global Secure Access.
HideSignOutButton
Value of 1 – Makes it possible to sign out of the GSA client. However, it requires local administrative privileges. This is the default value
Value of 0 – Prevents the user from signing out of the GSA client.
New-ItemProperty -Path 'HKLM:Software\Microsoft\Global Secure Access Client' -Name HideSignOutButton -Value 1 -PropertyType Dword
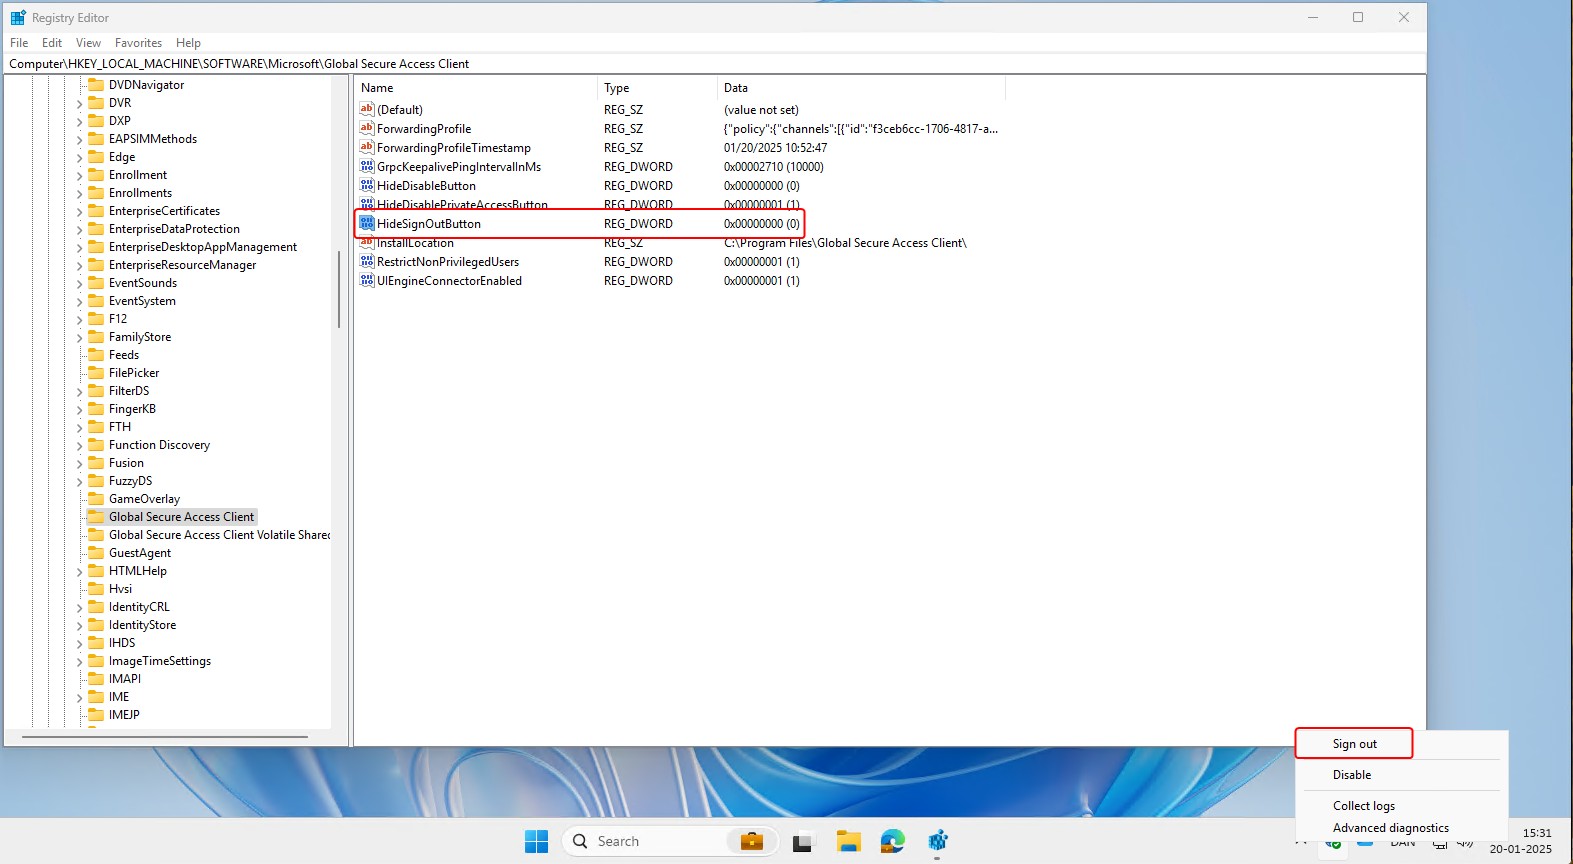
I recommend to you hide the sign out button, preventing the user from signing out of the GSA client or triggering a UAC prompt when trying to sign out as a non-admin user.
HideDisablePrivateAccessButton
Value of 1 – Hide the disable/enable Private Access. This is the default value
Value of 0 – Show the disable/enable Private Access. This makes it possible for the user to disable the Private Access feature in the GSA client.
New-ItemProperty -Path 'HKLM:Software\Microsoft\Global Secure Access Client' -Name HideDisablePrivateAccessButton -Value 1 -PropertyType Dword
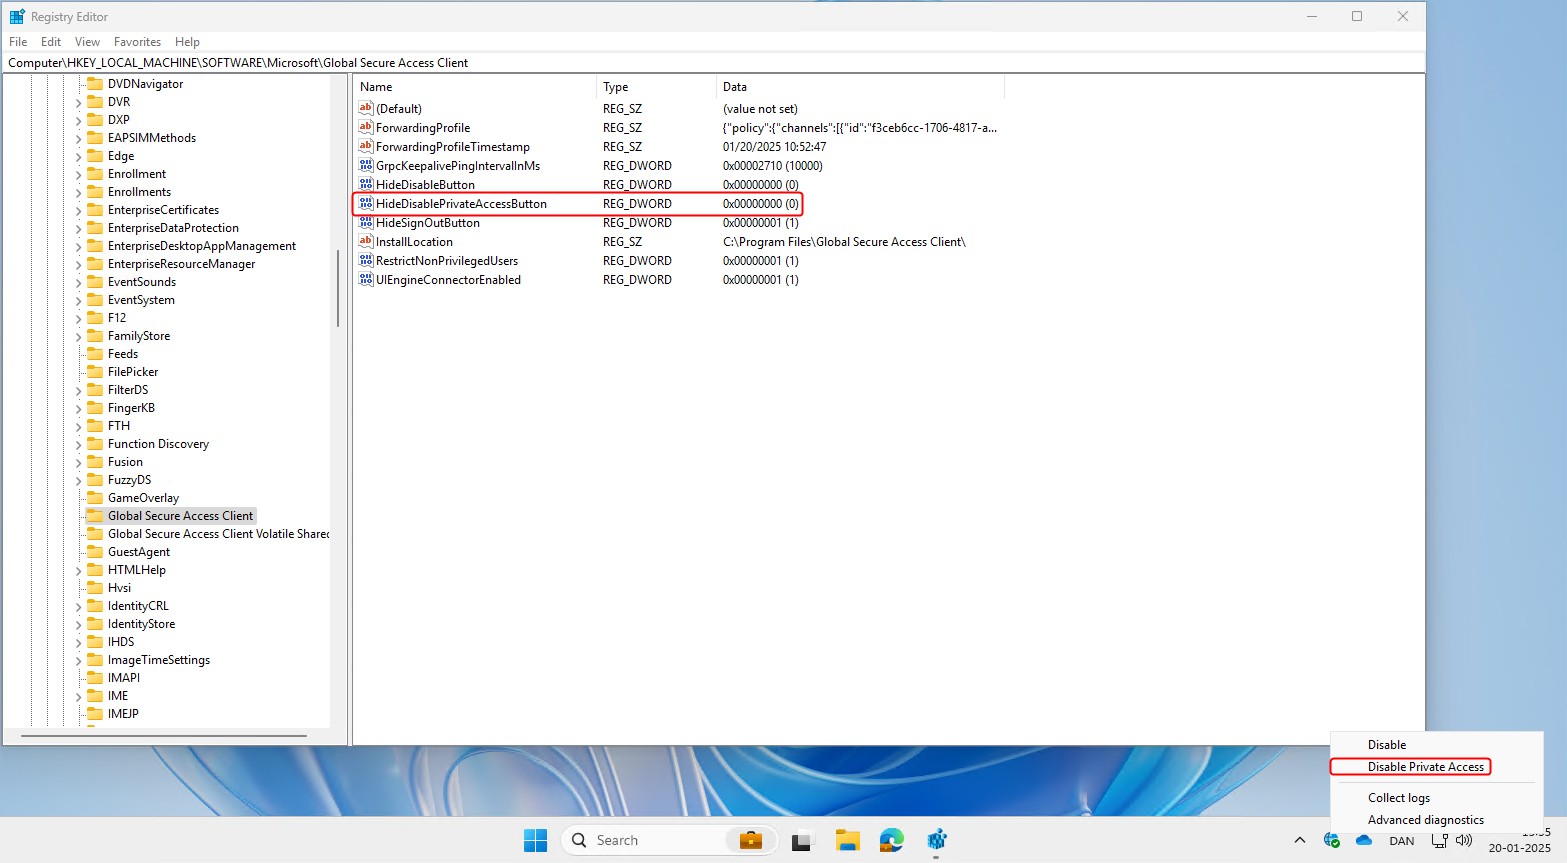
I recommend hiding the disable Private Access button, to prevent users from disabling the Private Access feature.
HideDisableButton
Value of 1 – Hide the disable button, preventing the user from disabling the GSA client.
Value of 0 – Show the disable button. This makes it possible to disable the GSA client, if the user has local admin privileges. This is the default value.
New-ItemProperty -Path 'HKLM:Software\Microsoft\Global Secure Access Client' -Name HideDisableButton -Value 0 -PropertyType Dword
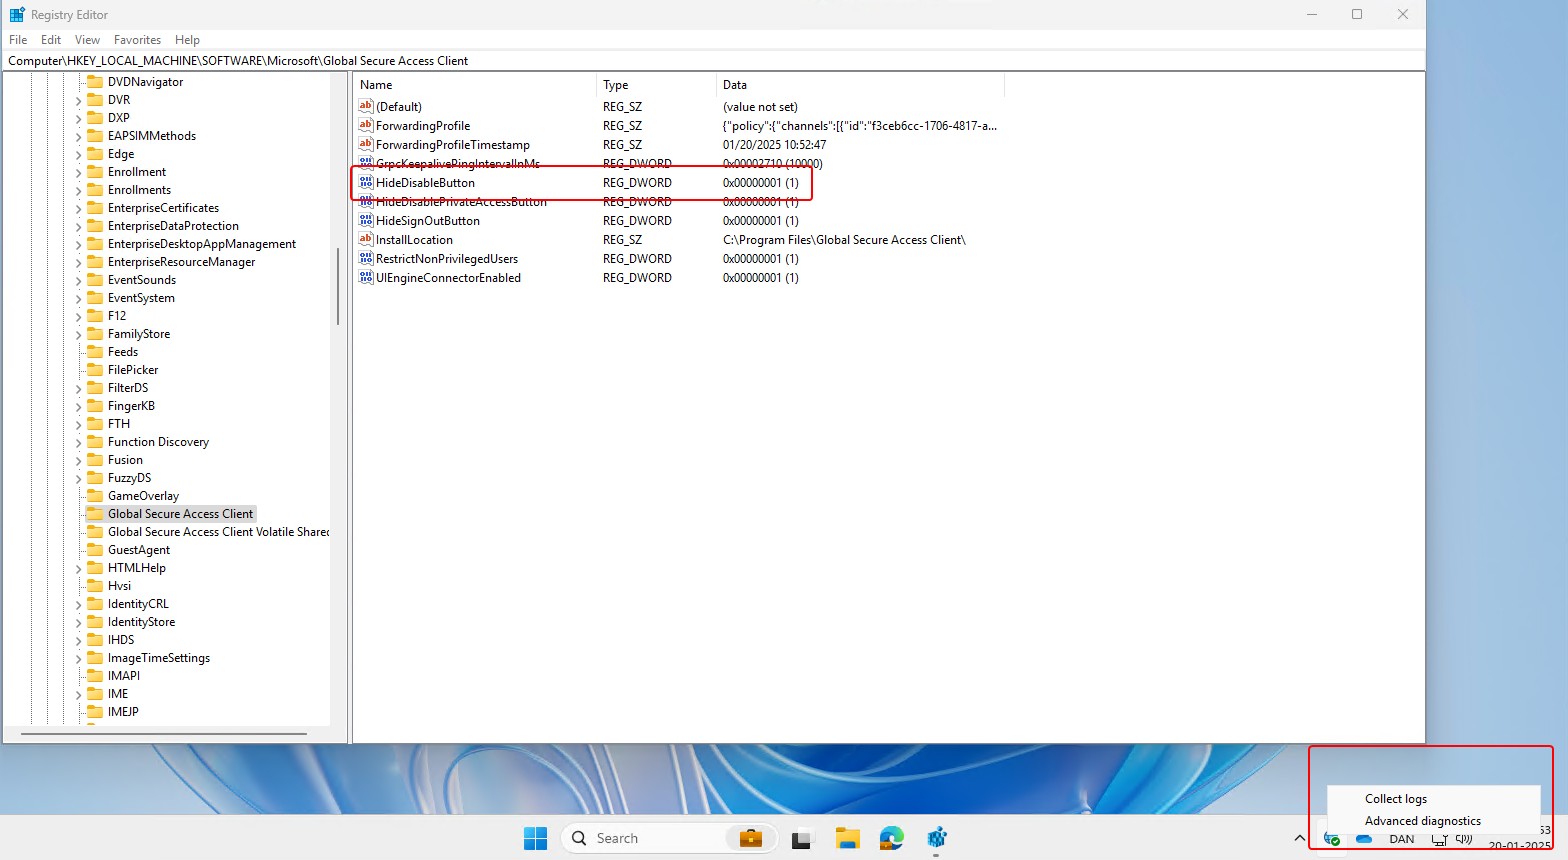
I recommend hiding the disable button to prevent the user from disabling the GSA client or triggering a UAC prompt when trying to disable the GSA Client as a non-admin user.
FarKdcTimeout
As mentioned I recommend disabling the kerberos negative cache feature to prevent any issues with kerberos SSO to on-prem Active Directory resources. You can disable kerberos negative caching using the FarKdcTimeout registry name in the registry key HKEY_LOCAL_MACHINE\SYSTEM\CurrentControlSet\Control\Lsa\Kerberos\Parameters
Value of 0 – Disable the kerberos negative caching feature
New-ItemProperty -Path 'HKLM:SYSTEM\CurrentControlSet\Control\Lsa\Kerberos\Parameters' -Name FarKdcTimeout -Value 0 -PropertyType Dword

DisabledComponents
Currently IPv6 is not supported in the GSA client. Microsoft recommends to configure Windows to prefer IPv4 over IPv6 this is done using the DisabledComponents name in the registry key HKEY_LOCAL_MACHINE\SYSTEM\CurrentControlSet\Services\Tcpip6\Parameters
Value of 32 – Configure Windows to prefer IPv4 over IPv6. This change requires a reboot to take effect!
With these registry values we have a way to restrict certain features of the Global Secure Access client and hopefully, in the future we’ll be able to apply these kinds of restrictions or modifications via Session Catalog policies in Intune.
New-ItemProperty -Path 'HKLM:SYSTEM\CurrentControlSet\Services\Tcpip6\Parameters' -Name DisabledComponents -Value 32 -PropertyType Dword

This concludes the article. Feel free to reach out to me on X or on LinkedIn if you have any comments or questions.