Working primarily with Microsoft Intune and Autopilot, it’s not often I have to deal with Windows imaging. Usually, it’s just a matter of uploading the device hash to Autopilot and from there the device will go through the provisioning of Windows. However, from time to time I do get the question: “How do I reimage my device?”, and admittedly most of the time “using a USB stick”, is my answer. But if you have more than 5-10 devices this is not the best approach, as it’s time consuming, requires a bunch of USB sticks and in some edge cases you might even have to provide a driver for the NIC during the Windows setup phase, for the device to be able to connect to the network.
A few use cases
One of the use cases for Windows reimaging could be a hard drive replacement. In this case the original hard drive is no longer working and must be replaced, the new drive is usually blank and Windows must be reinstalled. If this scenario only happens once every other year, then using a USB stick may be the easiest and fastest approach however, with a larger fleet this may occur several times a year.
Another case could be a requirement to wipe everything on an existing hard drive, this would usually be on a brand-new device, where you want to remove the existing image to clean out any unwanted software (bloatware). With existing devices already enrolled in Intune, you would simply use the “Wipe” feature instead.
A case I have seen a few times now, is when you want to migrate older, but still usable Windows devices from a legacy on-prem technology to Intune. These devices might be running Windows 10 and as a part of the migration process, they must be upgraded to Windows 11 using a brand-new image, not an in-place upgrade.
Old meets new
So, what is the old and new in this case? Well, the old is a very old acquaintance – Windows Deployment Server (WDS), some may even remember the predecessor Remote Installation Server (RIS).
WDS provides WIM-based imaging using the Pre-boot Execution Environment (PXE), in other words, you can do a network boot (usually via the F12 key on the keyboard) and via this network boot you can install Windows 11 using a WIM file. In this case a network boot consists of a Windows Preinstall Environment (WinPE) image which provides a way to deliver the Windows 11 image and start the Windows 11 setup process. In the old days we would maintain this Windows image, the so called “Golden Image” with drivers, Windows Updates, software and other modifications that had to be a part of the image, and multiple Golden Images usually meant more maintenance time, as each Golden Image had to be individually maintained. Considering modern technology with Intune and Autopilot, manual Windows image maintenance and management, is in most cases not a very good place to be.
On that note, in comes the new – OSDCloud. OSCloud is a community tool for deploying Windows 11, using Windows 11 images downloaded directly from Microsoft. The latest drivers are downloaded from Microsoft Update Catalog and DriverPacks for Lenovo, HP, Dell and Microsoft Surface are downloaded directly from the manufacturer website, even firmware updates are downloaded from Microsoft Update Catalog and applied during WinPE. Just like that, many hours of Windows image maintenance and management are gone, as drivers and firmware updates are automatically applied during Windows setup. OSDCloud can be configured to run on a USB stick, perfect for a one-off reimaging of a device, either fully automated or using a GUI.
The purpose of this article is to share how WDS and OSDcloud can work together, to create a lightweight, low maintenance and fully automated Windows imaging solution that supports PXE boot, which is a great temporary solution for reimaging existing Windows devices to make them ready for Intune enrollment via Autopilot.
Prerequisites
- A Windows Server of a recent date (Please don’t use some old stuff like 2012, 2016 or 2019)
- This script on my Github repo
How the script works
- The script installs and enables the WDS role in the Windows Server.
- WDS is default installed and configured in “Stand alone” mode.
- If you need Active Directory integration, use the -WDSMode parameter.
- The Windows ADK and Windows PE are downloaded and installed.
- They are needed to create the boot.wim image containing the OSDCloud configuration.
- The OSDCloud powershell module has been downloaded
- A OSDCloud template is created
- A OSDCloud workspace is created and configured
- A Windows PE image is build using the default parameters.
- The Windows PE image is imported to WDS
In the screen recording below, you will see that I use the command – .\Install-WDS-OSDCloud.ps1 -WindowsVersion 25H2. This is the default command to get the script working.
The parameters -WindowVersion must be provided and will configure the Windows 11 25H2 en-US image to be downloaded and installed. If you need another language, you must run the script again and use the -WindowsLanguage parameter and configured the needed language i.e. da-dk for danish Windows 11 25H2 image language.
However, before proceeding you may need the -OSDCloudDriver. This parameter will add certain drivers, including the NIC driver, to the boot.wim file. The parameter -OSDCloudDriver IntelNet will add drivers for Intel based NICs to the boot.wim file.
Seeing is believing – screen recordings
The following screen recordings show the script in action on a Windows Server 2025 VM and a physical Windows 11 machine showing how drivers are downloaded and installed.
I am using this syntax: .\Install-WDS-OSDCloud.ps1 -WindowsVersion 25H2 -OSDCloudDriver IntelNet as my physical Windows 11 machine is an older Lenovo T480s with an Intel based NIC.
Windows Server VM
I decided to record the entire install and configuration process, it takes around 30 minutes on a VM in my lab, it may be faster or slower in your environment.
If anything goes wrong during the script execution, a logfile is created in C:\Temp where you should get an idea about what went wrong.
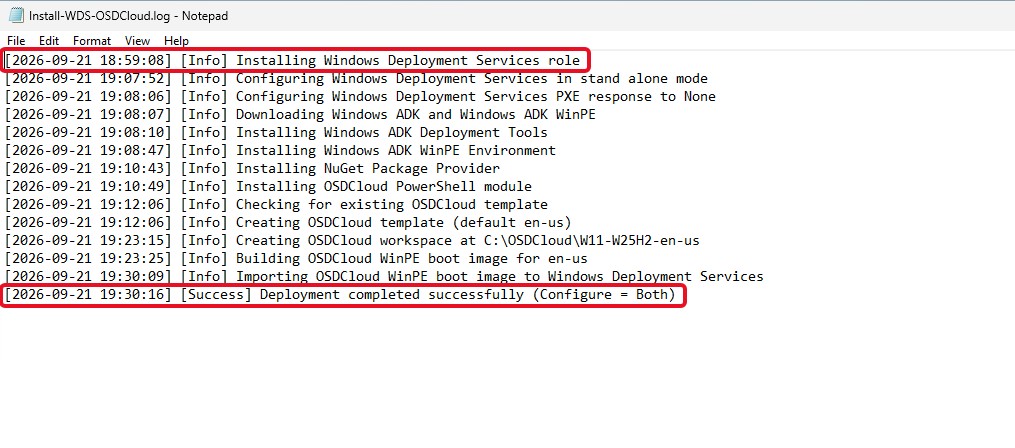
Here you can see the timespan of the script execution and that the deployment completed successfully.
After the script execution, there is one manual task to add to the WDS configuration to make the server respond to PXE requests. You can use the parameter -WDSAnswerClients All to configure this during script execution. This is not enabled by default because it may interfere with existing PXE servers on the network, in this case you must know a bit about your network and whether there are any existing PCE servers configured.
To enable PXE response via the GUI:
Launch Server Manager -> Tools -> Windows Deployment Services:
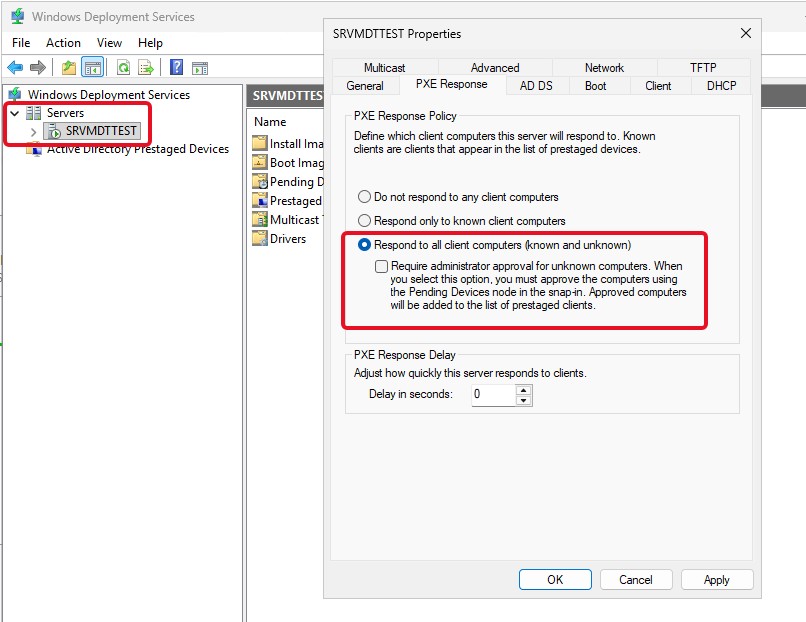
Select “Respond to all client computer (known and unknown) and click OK.
Windows 11 laptop – Lenovo T480s
This recording is, as you might notice, not a screen recording. It’s recorded using a Samsung smartphone. The reason for this is, I want to show the driver installations during the Windows setup process. As I am using Hyper-V in my lab I cannot show the driver installation during Windows setup, as there are no drivers installed via OSDCloud on Hyper-V machines.
The recording is about 25 minutes long, and most of it is the Windows setup process. However, if you skip forward to around the 13:40 mark, you can see a small popup where the driver install begins. I this case, with my trusty Lenovo T480s, the audio, chipset and video drivers are installed during the Windows setup phase
To summarize. Using this approach, you get a simple yet effective way to reimage both current and new Windows machines. It’s low maintenance and would only require you to do reconfiguration when there is a new Windows feature release or if there is one or more new computer manufacturers introduced. To do reconfiguration when there is a new Windows feature release, just run the script again, but remember to apply the parameter -Configure OSDCloud like this:
.\Install-WDS-OSDCloud.ps1 -WindowsVersion 26H2 -OSDCloudDriver IntelNet -Configure OSDCloud
Or if you want to introduce another Windows 11 25H2 language:
.\Install-WDS-OSDCloud.ps1 -WindowsVersion 25H2 -OSDCloudDriver IntelNet -WindowsLanguage da-DK
The parameter -Configure OSDCloud will skip the WDS install and configuration and configure a new OSDCloud template, leaving any current templates untouched.
This concludes the article. Feel free to reach out to me on X or on LinkedIn if you have any comments or questions.