During my many years as a consultant I have spent a lot of time on application management in Windows. Recently I have come across a few familar challenges at a couple of customers who were struggling with application management.
Before going any further, I want to share my understanding of the term “application management” and what it covers.
Application Management covers 3 areas and they are not prioritized as they are all equally important:
- Storing the application source files, configuration files and whatever other files that are needed to successfully install or uninstall the application to facilitate version control of the application. It’s a good idea to build a repository for your application source files.
- A standardized way of deploying the application. If you standardize the way application is deployed not only will it be easier to maintain the application with updates, changes etc., it will also be easier to document the install, upgrade and uninstall processes.
- Documentation on how the application is deployed, upgraded and uninstalled.
In this part 1 in a series of blog posts, I will share my experiences and reccomendations on how to create a repository for your application source files and how to standardize application deployment using a well-known and almost industry standard application deployment framework together with Microsoft Intune.
I also want to mention, that I am fully aware of application management solutions from Patch my PC and RoboPack and if you don’t know what Patch My PC and RoboPack offers, I strongly recommend to take a closer look at their solutions, as they will make your life easier, when managing applications.
However, if you are not interested in what Patch My PC or RoboPack offers or if they don’t cover all of the applications in your setup, or if you just prefer manual application management, this article is for you.
Building a software repository
One of the challenges I have seen, is the lack of a centrally maintained application repository. This usually means that source files for one or more applications are not available when needed, thus you have to go to various vendor websites to download whatever source files that are needed or maybe even contact different application owners to get the source files needed.
Building and maintaining an application source file repository is important, mostly because it helps to keep track of the files that are needed to deploy an application this includes storing multiple versions of the same application, so that you are able to quickly re-package an earlier version of an applications, if needed.
I have often assisted in situations where one or more people responsible for endpoint device management and/or application management have no idea how an application in their Intune setup is installed or whether it requires any customizations, to be installed correctly. On a few occasions, I have seen that multiple members in the same team responsible for endpoint management and/or application management maintaining their own personal application source file repository or not having a repository at all.
These situations usually complicates things a bit when I am the one hired to update one or more applications in their setup, mainly because I don’t have access to each individual software repository but also because the application install, upgrade and uninstall processes are rarely documented, which means I have to put my detectives hat on and figure out how the application is install, upgraded and uninstalled.
When I am creating a new application source file repository, I always start out with a basic folder structure on a file server. You could of course use something like a library in SharePoint Online or Teams or maybe even an Azure blob storage account, but in this demo I’ll be using a simple folder structure.
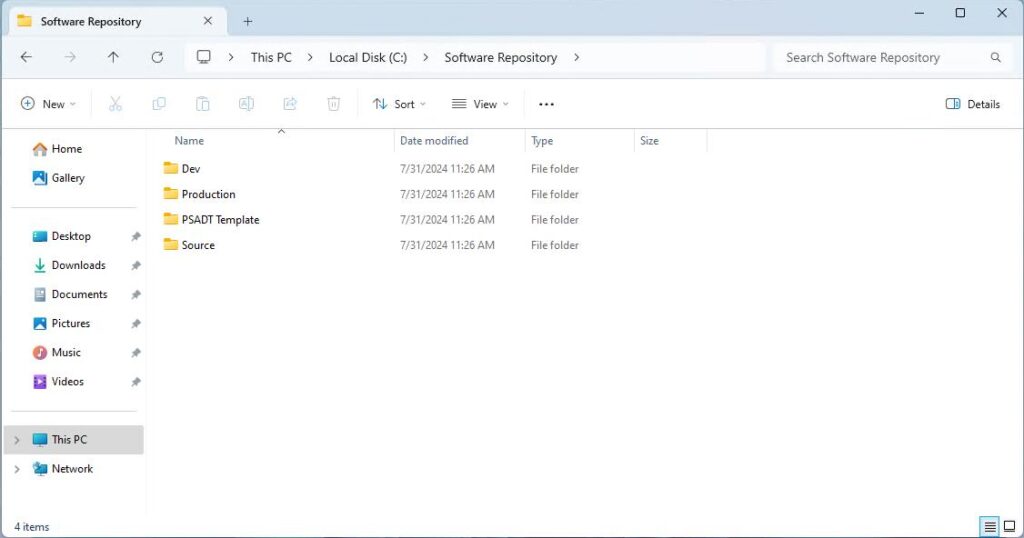
Let’s go through the folders, from the bottom.
The Source folder is where I keep the source files for all my apps, I’ll create a folder for each application, in this case Notepad++.
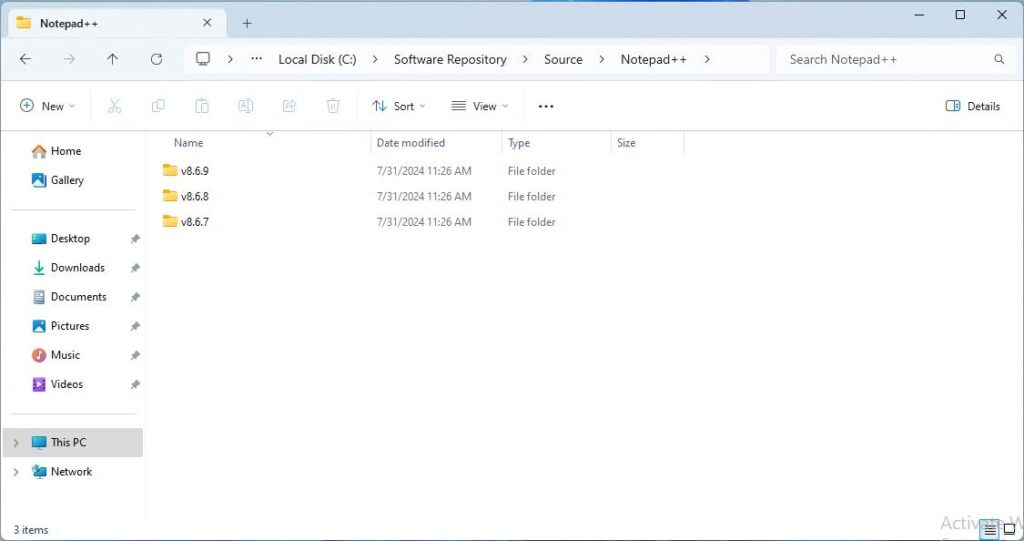
In the Notepad++ folder I’ll create a folder for each version of the application where the source files for the version resides. Here I have the source files for the latest 8.6.9 version of Notepad++ and 2 previous versions. The number of different versions you want to store is entirely up to you. Some wants to store 2 or 3 versions back; others only want the latest version and the previous version of the application.
Streamlining application deployment
Another challenge I am often faced with, is that there are no standard way when deploying applications which usually means that applications are deployed in different ways. That might not be ideal in troubleshooting scenarios or if you, like me, are hired to update existing application packages.
Here is an example on 3 different ways to deploy an application via Microsoft Intune:
The 3 examples above are not an unusual scenario for me and it usually boils down to different people manages Intune and applications in different ways which in the long term is not an ideal scenario.
Going back to the software repository folder.
The PSADT Template folder (PSADT is short for Powershell AppDeploy Toolkit) is where I keep the PSADT framework files. We’ll have a quick look at the contents in a moment, first I want to go through what the Powershell AppDeploy Toolkit framework is.
Powershell AppDeploy Toolkit is a well-known framework for streamlining software deployment. It consists of a range of different Powershell functions that makes it easier to deploy applications. A great thing about these functions is that they log everything they do to a central log file. This means that if something goes wrong in the script execution, maybe we mistyped the filename of one or more of the sources files used during application install, this will be logged to a central log file, and we don’t have to sit and guess on what the issue could be.
PSADT has a website with tons of information, however I find myself mostly using the reference part of the docs. The reference part contains information about every function available in PSADT and I would highly recommend going through the list of functions, so that you at least know which functions are available. You might only use a handful of functions when working with PSADT, however it’s good to have at least some basic knowledge of the remaining functions for any edge cases you might encounter when dealing with application deployment. On the PSADT website you will of course also find a download link to the latest PSADT version released. The link goes to the PSADT Github site.
Circling back to the PSADT Template folder. In here you’ll see that I have a Media folder and a Detection.ps1 script file. For now I’ll focus on the Media folder, the DetectionScript.ps1 will be covered in part 2 of this article.
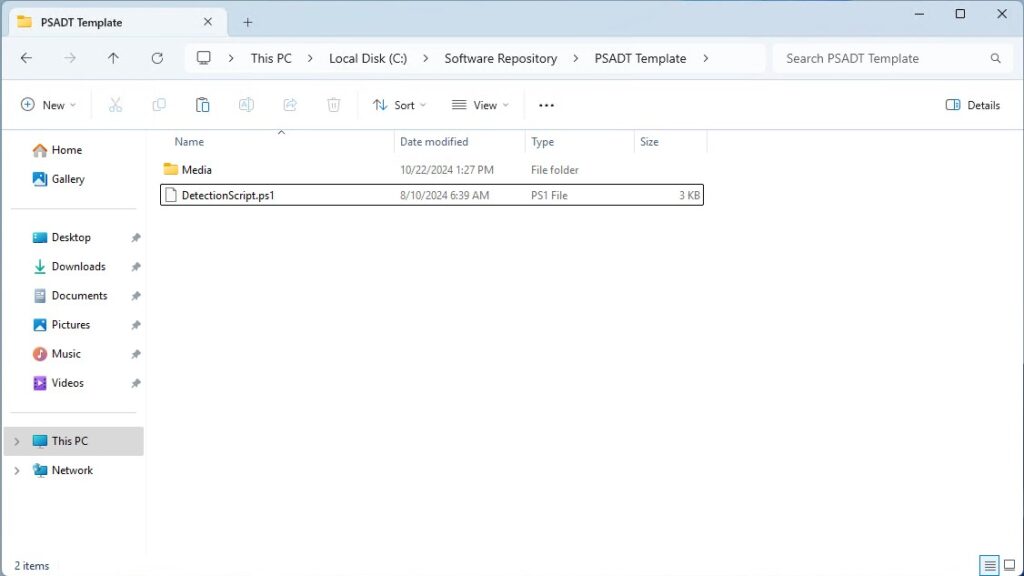
In this case, the Media folder contains the PSADT framework files including any application source files needed.
I use the Media folder to avoid any confusing about what goes with the applications package and what doesn’t, in this case everything in the Media folder goes in the Win32 app/Intunewin file.
Get started with Powershell App Deployment Toolkit
Let’s go through the process of creating a new application, in this case Notepad++.
The first thing to do is to copy the PSADT Template folder to the Dev folder. The Dev folder is where you would keep your new apps or apps that needs updating until they are ready to go to production.
Next, rename the copied PSADT Template folder to something that would help identify which application we are dealing with, the language, architecture and version.
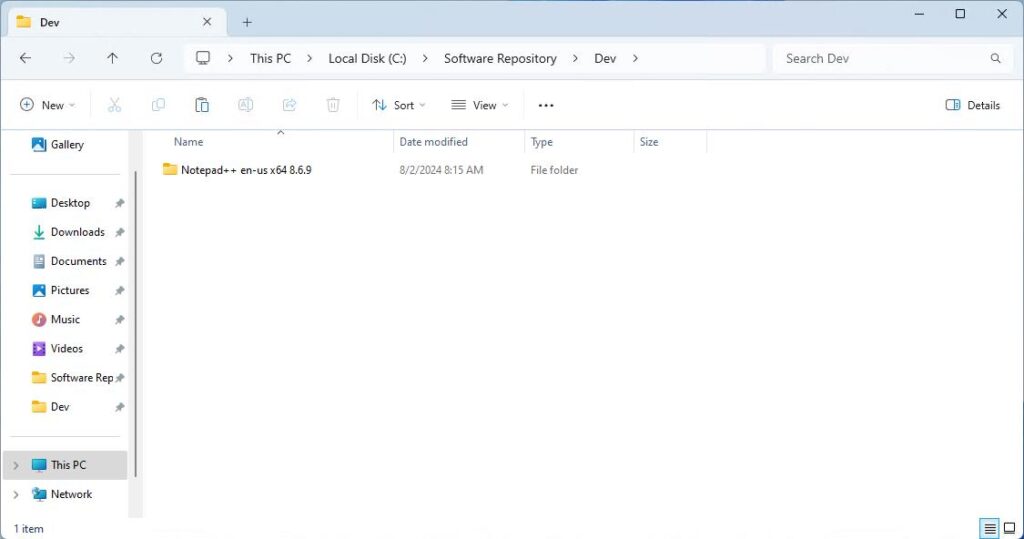
Go back to the source folder and get latest Notepad++ exe (v8.6.9) source file.
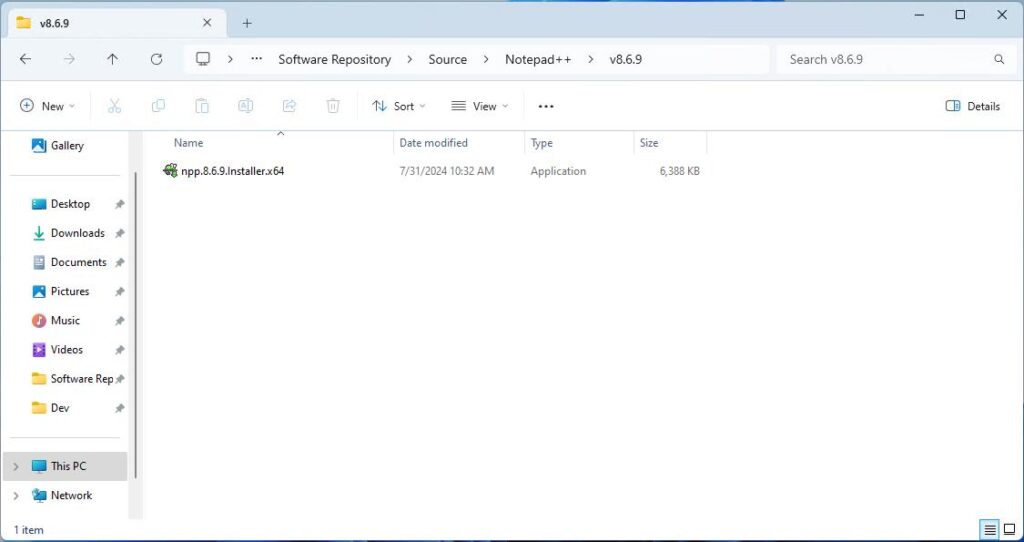
Copy the exe file to the Dev\Notepad++ en-us x64 8.6.9\Media\Files folder
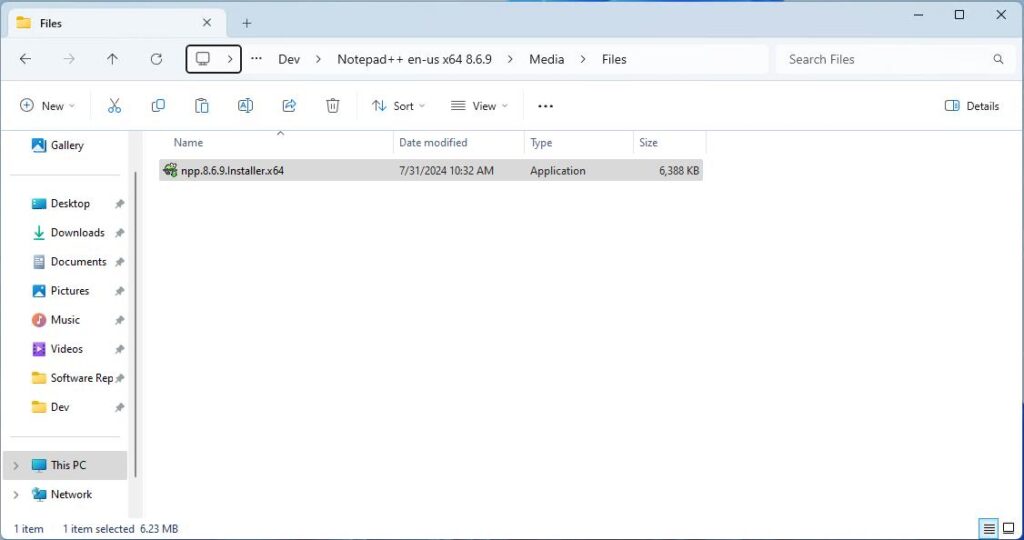
The foundation for building an application package to be deployed using Microsoft Intune is now set. Let’s look at how to build the application package using PSADT.
Powershell AppDeploy Toolkit 101
It’s time for a some PSADT training which should provide you with a basic understanding of how PSADT works.
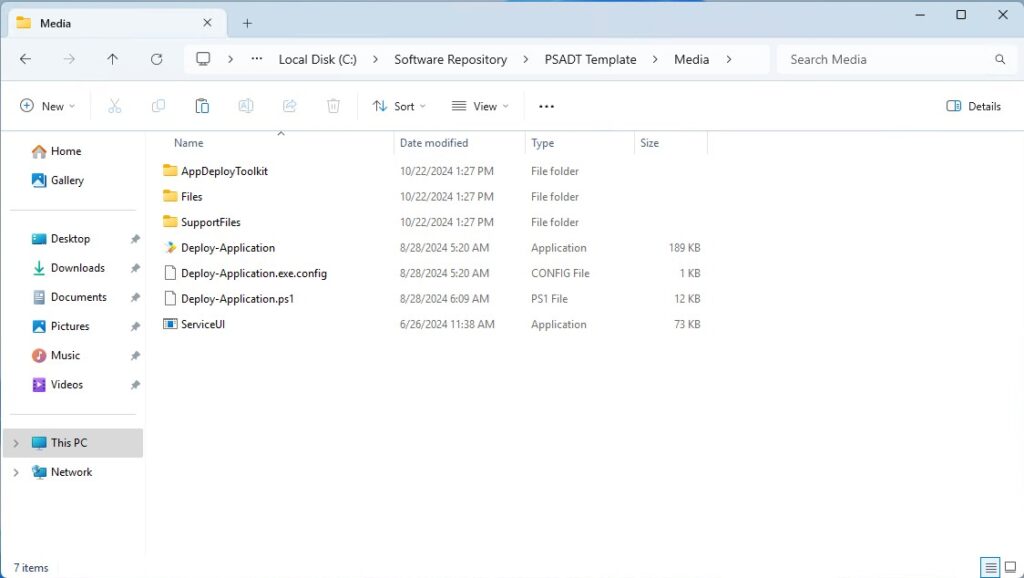
Let’s start out with the basic file and folder structure of the PSADT framework:
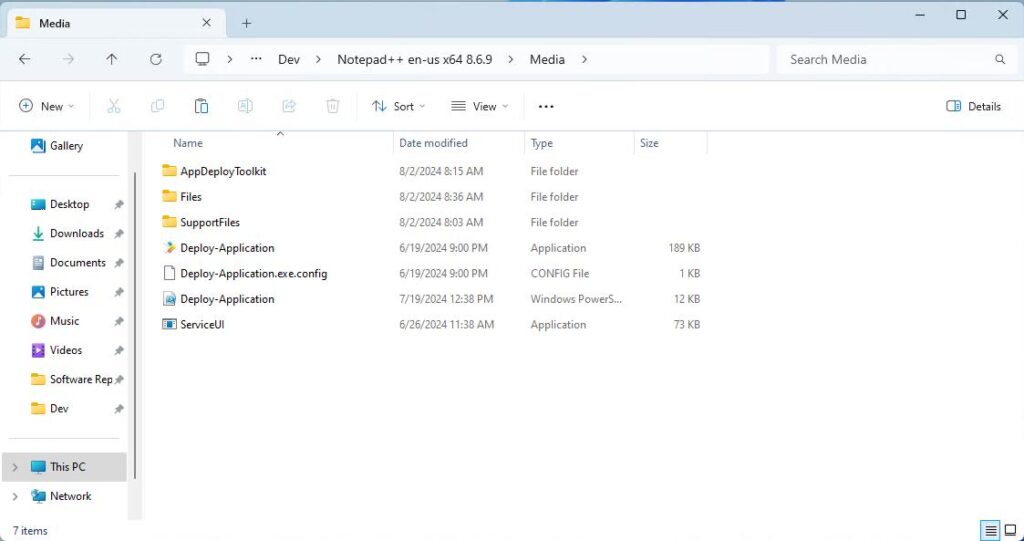
The AppDeployToolkit folder contains the PSADT configuration file and the PSADT Powershell functions available, this is basically the heart of the PSADT framework. In part 3 of the series, we’ll have a closer look at the configuration file and what we can do here.
By now, you know that the Files folder is where the application source files go. Any exe or msi files that is needed to deploy the application should be in this folder.
The SupportFiles folder is where files supporting the deployment should go. That might be a configuration file that needs to be copied to a local folder either before or after the application deployment or an msp or mst file that is needed during deployment.
The Deploy-Application.exe file and exe.config files are used to kick off the Deploy-Application.ps1 script. To successfully deploy the application we need to edit the Deploy-Application.ps1 file and provide some basic information about the application. Use your favorite Powershell editor, I prefer Visual Studio Code, to make the necessary changes to the Deploy-Application.ps1 file.
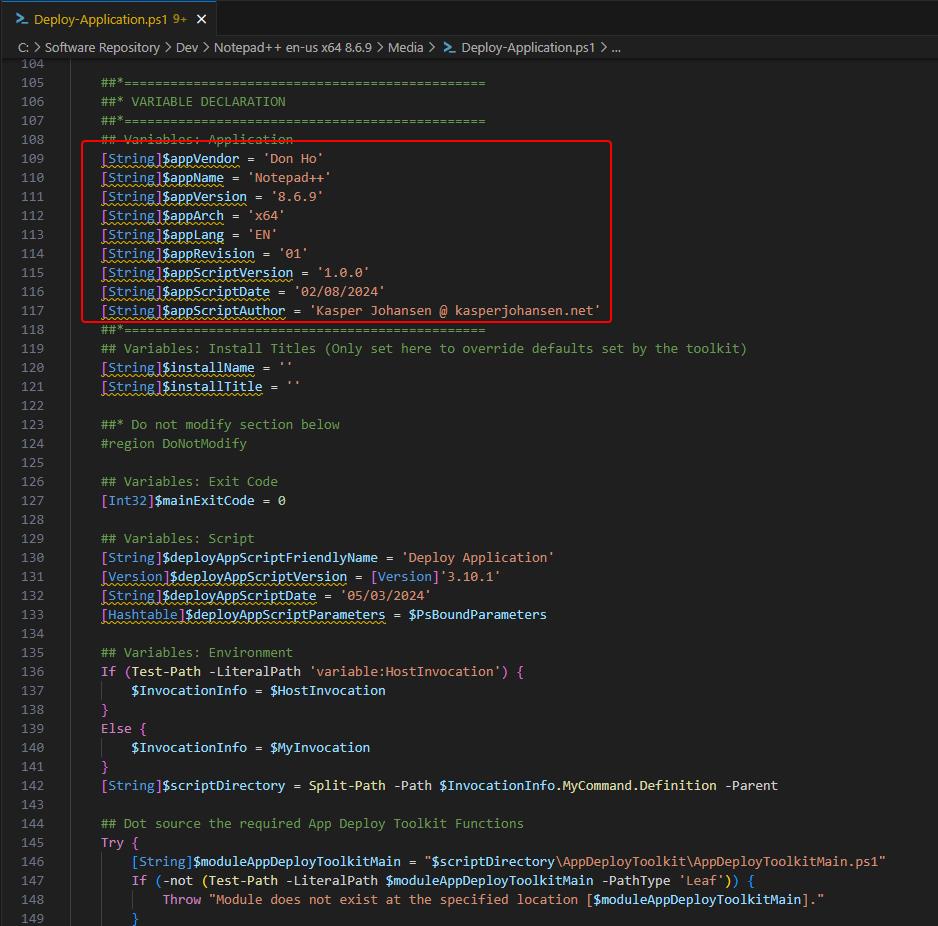
We’ll start out at line 109 to 117 where information about the application and author of the script is found. This information should be edited every time you have a new version of the application. Values in these variables are used when PSADT creates log files and displays information to the user.
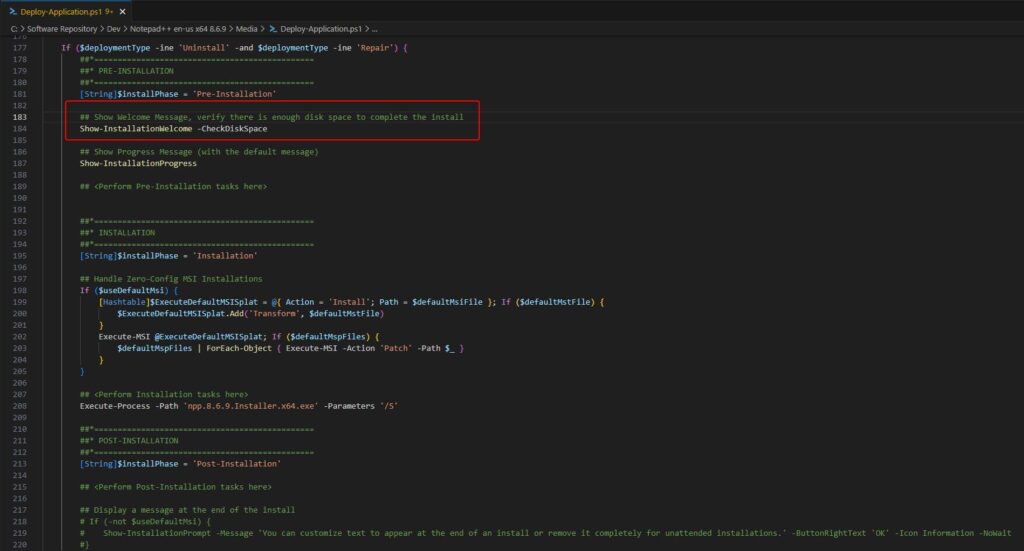
Next, go to line 184. This is the pre-installalation part of the script where we can have the script execute certain tasks before installing and application. The Show-InstallationWelcome function can show a dialog with application installation information, but it can also close running processes if needed. For now we only need the -CheckDiskSpace properties which will automatically check if there is enough disk space to install the application.
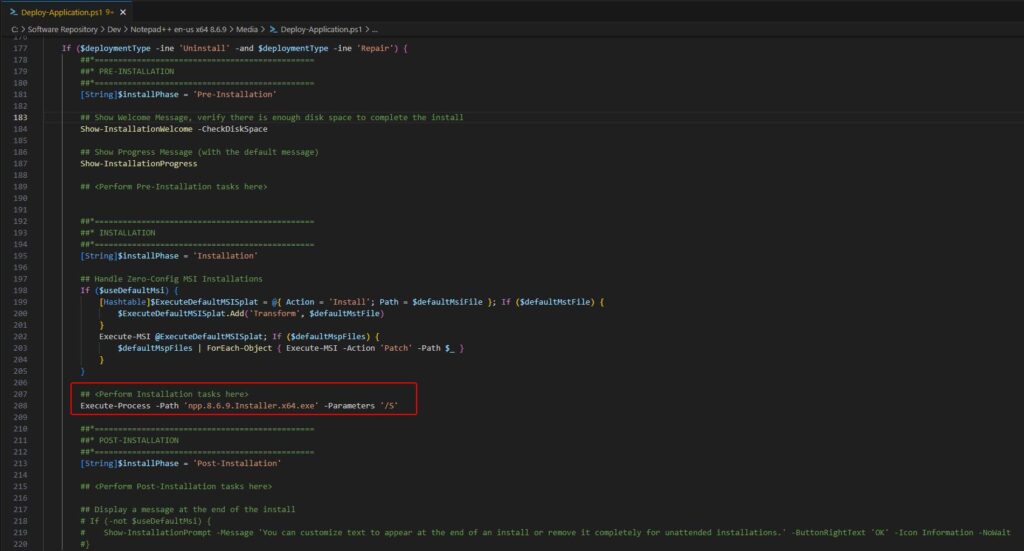
Next, go to line 208. In the Installation section of the script, using the Execute-Process function, the Notepad++ exe filename and install parameters are configured.
Next, go to line 229 where we have the Show-InstallationWelcome function again. This is the pre-uninstallation part of the script where we can have the script execute certain tasks before uninstalling and application. In this case the -CloseApps property, which will close any running instances of the notepad++ process and the -CloseAppsCountDown which will show a 60 second countdown timer, giving the user 60 seconds to close Notepad++ before uninstalling the application.
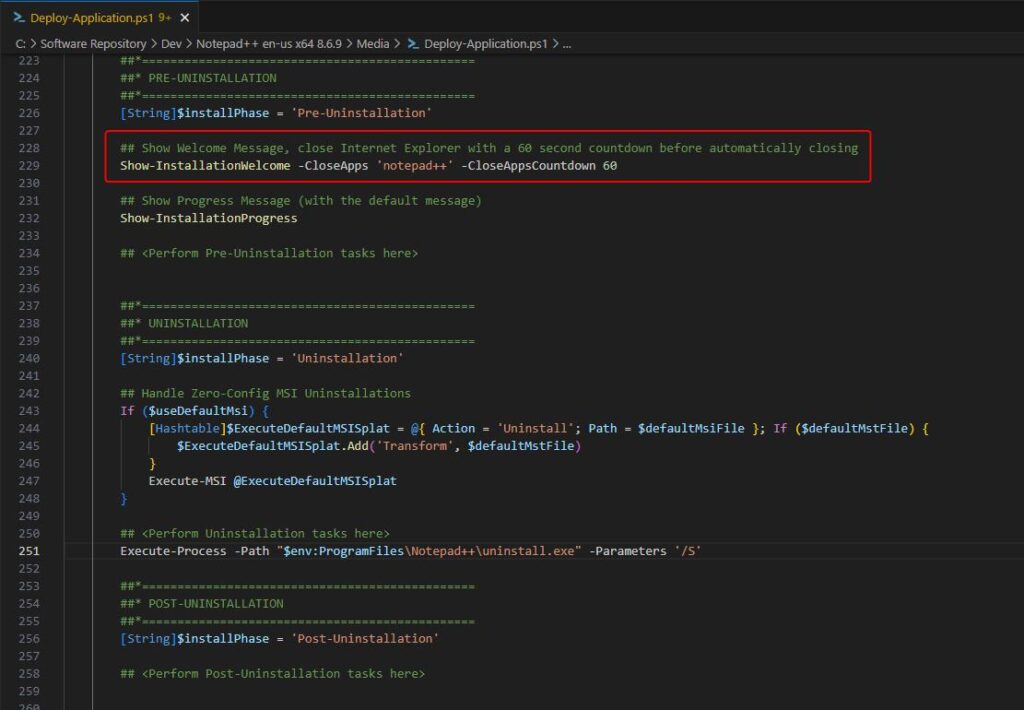
And lastly, go to line 251. In the Uninstallation section of the script, again using the Execute-Process function, the Notepad++ exe file and uninstall parameters are configured.
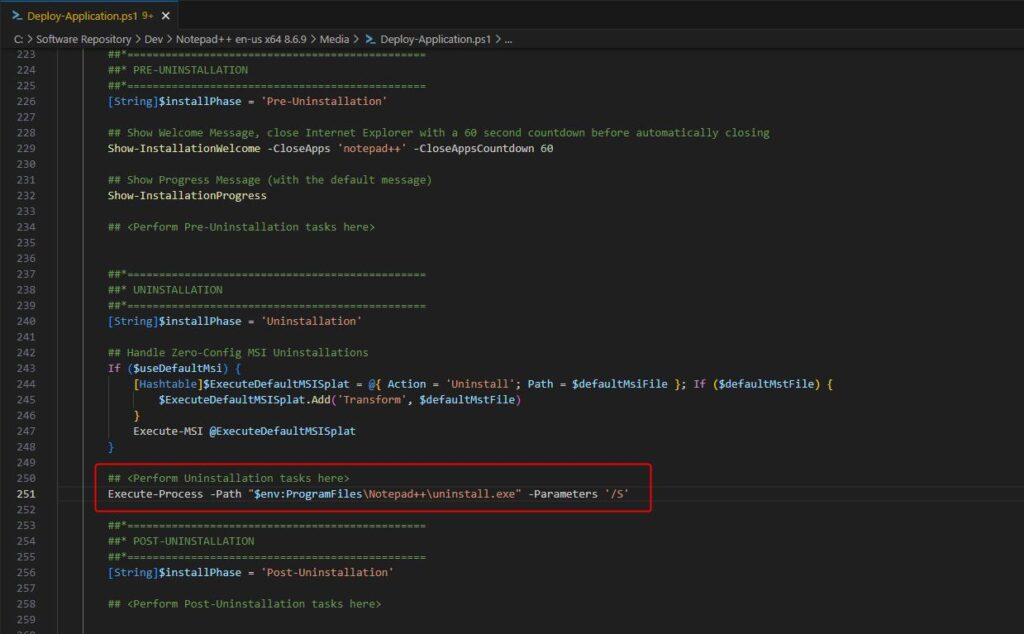
These changes are all it takes to create a basic deployment, which supports both installing and uninstall Notepad++. Make sure to save the Deployment-Application.ps1 file.
Returning to the PSADT template folder. The ServiceUI.exe file is not a part of the PSADT framework, it’s from the Microsoft Deployment Toolkit. When deploying applications with Intune this usually happens in SYSTEM context. This means that any informational messages the deployment might present, are not visible for the user, as the information is in SYSTEM context and not user context.
The ServiceUI.exe acts as sort of an intermediate between the SYSTEM context and user context, so that informational messages in SYSTEM context are visible for the user. In part 2 of the series, we’ll have a look at the differences between using the ServiceUI.exe and using the Deploy-Application.exe.
Powershell AppDeploy Toolkit in action
It’s time to see PSADT in action and verify that our Notepad++ both installs and uninstalls without any issues. I have created a small screen recording which shows how to install and uninstall using the Deploy-Application.exe file.
Obviously, this is a manual execution of the install and uninstall process of Notepadd++ using the PSADT framework and we don’t want to go around manually installing and uninstalling Notepadd++, this is what Intune is for.
Create a Win32 app with the Win32 Content Prep Tool
The last thing we need to do, to get the Notepad++ ready to deployment via Intune, is to convert it to a win32/intunewin file. This is done using the Microsoft Wind32 Content Prep Tool which can be found on the Microsoft Github.
Go to the Github repository using the link above and download the ZIP file
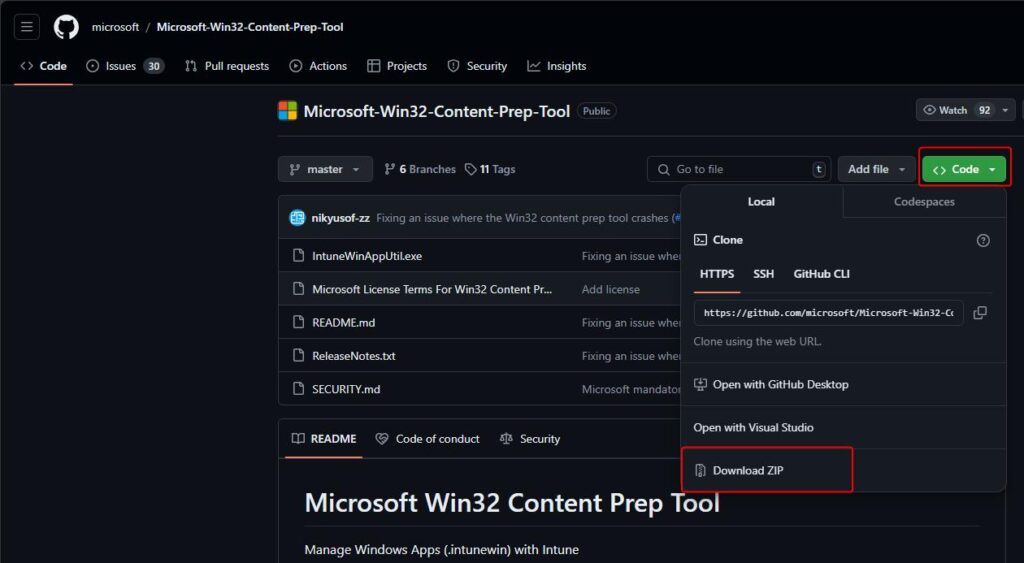
Extract the contents of the ZIP file.
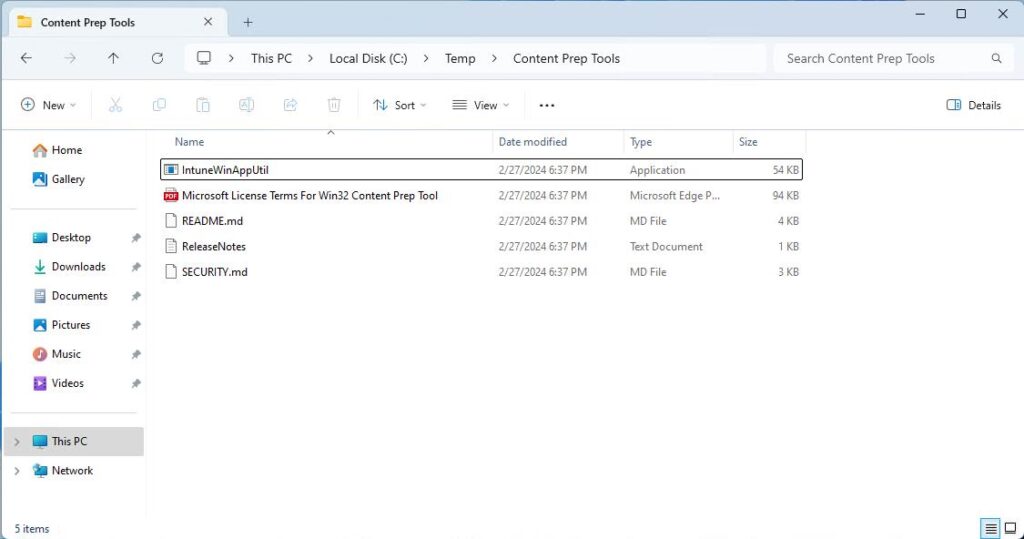
Once the ZIP file has been extracted you will have a few files available. We need the IntuneWinAppUtil.exe file to create the win32/intunewin file. The Content Prep Tool does not have a GUI, it’s a command-line only tool but luckily, it’s a fairly simple tool with only a few command-line parameters available. IntuneWinAppUtil.exe /? shows the command-line parameters available.
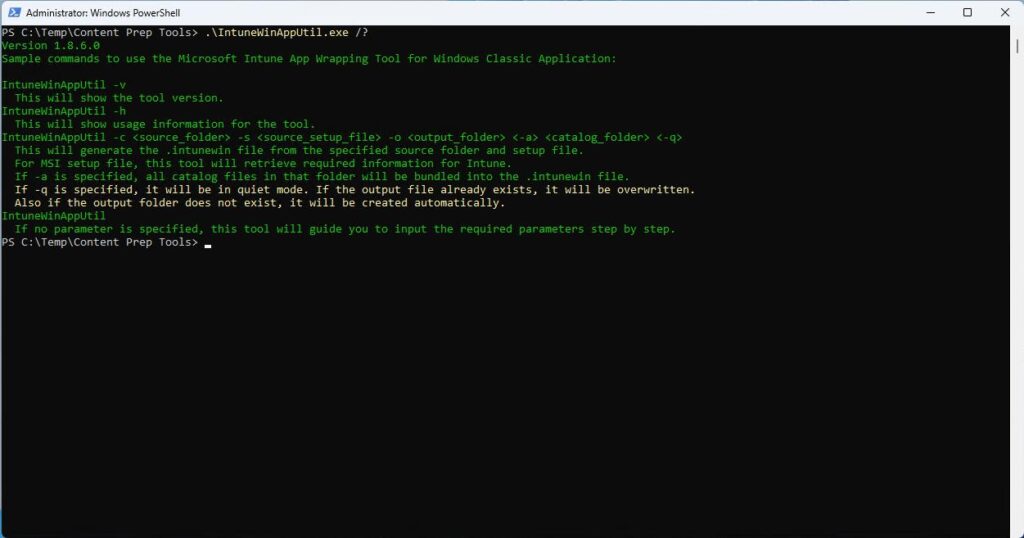
In this case, we need to provide a source folder, a source setup file and an output folder.
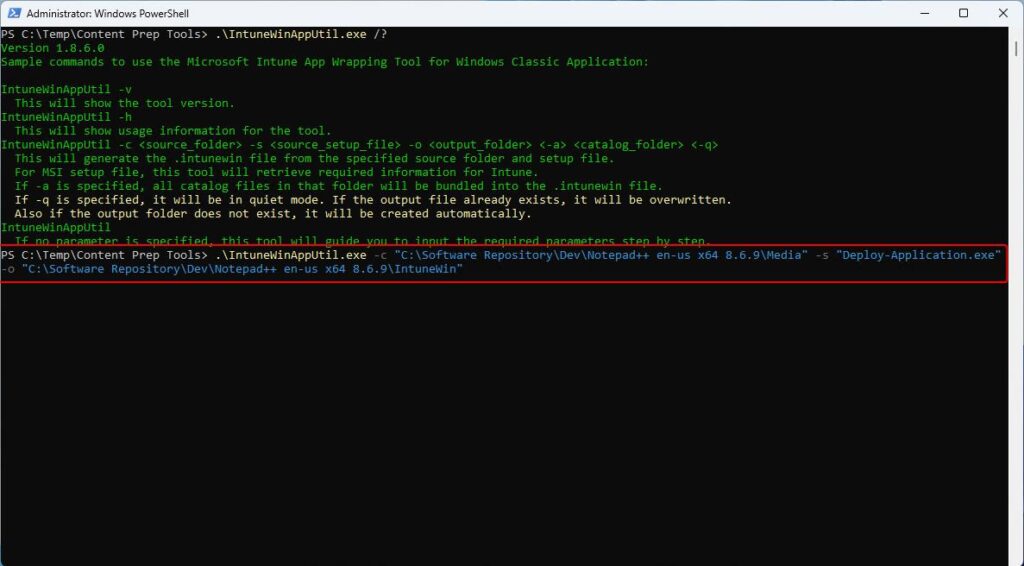
This will provide you with an intunewin file, ready to upload to Intune.
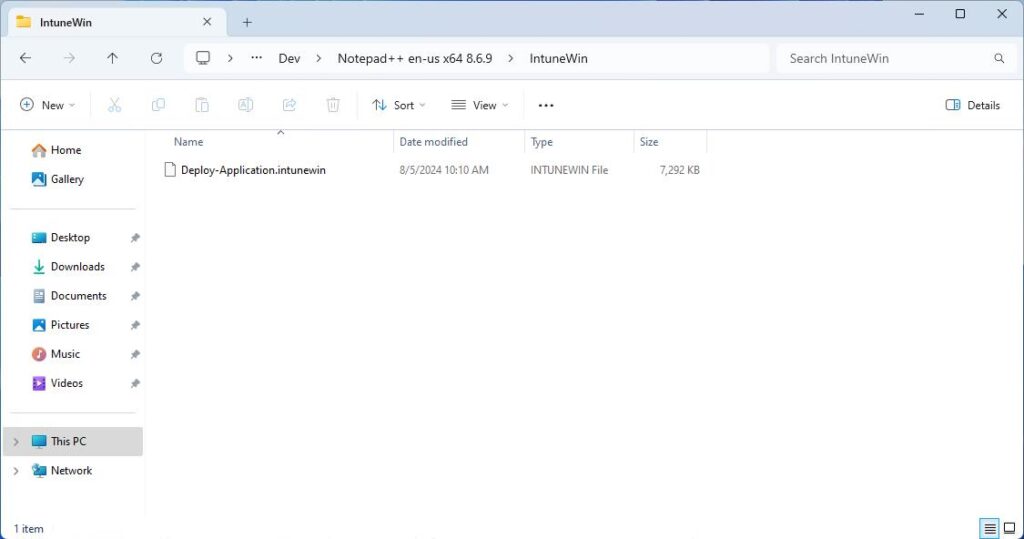
If you are still with me, you should now have basic knowledge on how to get started with your new software repository and with streamlining your application management using PSADT. Stay tuned for part 2 of the series, where we’ll upload our newly created Notepad++ application to Microsoft Intune and configure the application detection setting using a custom detection file.
This concludes this part 1 of how to streamline application management with PSADT and Intune.
Feel free to reach out to me on X or on LinkedIn if you have any comments or questions.


